How to Configure & Run Appium Test script throughJenkins Server:
In this post, I’m going to explain how to configure Appium with
Jenkins Server.
I have breakdown the whole Appium configuration with Jenkins as
high-level steps as below:
- Create Maven Project
- Add Tests to Maven Project
- Install Jenkins
- Configure the Jenkins Job
- Run the job
Let’s start the configuration :
Prerequisites:
1. Appium setup should be completed. In case you are new , please
follow these steps to do "Appium setup"
Steps:
1. Create maven project. In case you are new to maven project
creation follow this post “How to create maven project for automation”
2. Post maven project creation, project structure should like
below:
3. Open the “pom.xml” file add the below maven
dependencies:
<dependencies>

                         <dependency>
                                    <groupId>io.appium</groupId>
                                    <artifactId>java-client</artifactId>
                                    <version>7.0.0</version>
                        </dependency>

                         <dependency>
                                    <groupId>org.testng</groupId>
                                    <artifactId>testng</artifactId>
                                    <version>6.9.13.6</version>
                        </dependency>
            </dependencies>
Appium & TestNg dependency:
4. Now POM looks like below:
<project xmlns="http://maven.apache.org/POM/4.0.0" xmlns:xsi="http://www.w3.org/2001/XMLSchema-instance" xsi:schemaLocation="http://maven.apache.org/POM/4.0.0 http://maven.apache.org/xsd/maven-4.0.0.xsd">
  <modelVersion>4.0.0</modelVersion>
  <groupId>Appium</groupId>
  <artifactId>POMframework</artifactId>
  <version>0.0.1-SNAPSHOT</version>

           <dependencies>
                       <dependency>
                                    <groupId>io.appium</groupId>
                                    <artifactId>java-client</artifactId>
                                    <version>7.0.0</version>
                        </dependency>

                        <dependency>
                                    <groupId>org.testng</groupId>
                                    <artifactId>testng</artifactId>
                                    <version>6.9.13.6</version>
                        </dependency>
            </dependencies>

</project>
5. Create “baseClass” package: right click on your project and
select New – Package and give name
as “baseClass” and click on finish.
6. Then right click on “baseClass” package and
select New -> Class and name as
“BaseClass.java” .
7. After this step project structure should look like
below:
8. Open “BaseClass.java” and add the below code:
package baseClass;

import java.net.MalformedURLException;
import java.net.URL;
import java.util.concurrent.TimeUnit;

import org.openqa.selenium.remote.DesiredCapabilities;
import org.testng.annotations.BeforeTest;
import org.testng.annotations.Parameters;

import io.appium.java_client.AppiumDriver;
import io.appium.java_client.MobileElement;

public class BaseClass {

            public static AppiumDriver<MobileElement> driver;
            @BeforeTest
            @Parameters({"deviceName","udid", "platformVersion","url"})
            public void setup(String deviceName, String udid,String platformVersion,String url) throws InterruptedException, MalformedURLException
            {
                        DesiredCapabilities cap=new DesiredCapabilities();
                cap.setCapability("deviceName", deviceName);
                cap.setCapability("udid", udid);
                cap.setCapability("appActivity", "com.android.calculator2.Calculator");
                cap.setCapability("appPackage", "com.android.calculator2");
                cap.setCapability("platformName", "Android");
                cap.setCapability("platformVersion", platformVersion);
                driver=new AppiumDriver<MobileElement>(new URL(url), cap);
                driver.manage().timeouts().implicitlyWait(15, TimeUnit.SECONDS);
                Thread.sleep(5000);

            }

}
9. Create “pages” package: right click on your project and
select New – Package and give name
as “pages” and click on finish.
10. Then right click on “pages” package and
select New -> Class and name as
“BasePOMpage.java” .
11. After adding above step, project structure should look like
below:
12. Open “BasePOMpage.java” and add below code and save it:
package pages;

import org.openqa.selenium.support.PageFactory;

import io.appium.java_client.AppiumDriver;
import io.appium.java_client.MobileElement;
import io.appium.java_client.pagefactory.AppiumFieldDecorator;

public class BasePOMpage {

public AppiumDriver<MobileElement> driver;

    public BasePOMpage(AppiumDriver<MobileElement> driver) {
        this.driver = driver;
        PageFactory.initElements(new AppiumFieldDecorator(driver), this);
    }

}
13. Then right click on “pages” package and
select New -> Class and name as
“CalculatorScreen.java” .
14. After this step project structure looks like below:
15. Open “CalculatorScreen.java” and add below code and save
it:
package pages;

import io.appium.java_client.AppiumDriver;
import io.appium.java_client.MobileElement;
import io.appium.java_client.android.AndroidElement;
import io.appium.java_client.pagefactory.AndroidFindBy;


public class CalculatorScreen  extends BasePOMpage{


            @AndroidFindBy(id = "com.android.calculator2:id/digit_1")
    private AndroidElement button1;

    @AndroidFindBy(id = "com.android.calculator2:id/digit_2")
    private AndroidElement button2;

    @AndroidFindBy(id = "com.android.calculator2:id/digit_3")
    private AndroidElement button3;

    @AndroidFindBy(id = "com.android.calculator2:id/digit_4")
    private AndroidElement button4;

    @AndroidFindBy(id = "com.android.calculator2:id/digit_5")
    private AndroidElement button5;

    @AndroidFindBy(id = "com.android.calculator2:id/digit_6")
    private AndroidElement button6;

    @AndroidFindBy(id = "com.android.calculator2:id/digit_7")
    private AndroidElement button7;

    @AndroidFindBy(id = "com.android.calculator2:id/digit_8")
    private AndroidElement button8;

    @AndroidFindBy(id = "com.android.calculator2:id/digit_9")
    private AndroidElement button9;

    @AndroidFindBy(id = "com.android.calculator2:id/digit_0")
    private AndroidElement button0;

    @AndroidFindBy(id = "com.android.calculator2:id/op_add")
    private AndroidElement buttonPlus;

    @AndroidFindBy(id = "com.android.calculator2:id/eq")
    private AndroidElement buttonEqual;

    public CalculatorScreen(AppiumDriver<MobileElement> driver) {
        super(driver);
    }

    public void clickButton_1()
    {

            button1.click();
    }

    public void clickButton_2()
    {

            button2.click();
    }

    public void clickPlusButton()
    {
            buttonPlus.click();
    }
}
16. Create “testScripts” package: right click on your project and
select New – Package and give name
as “testScripts” and click on finish.
17. Then right click on “testScripts” package and select “New -> Class and name as “TestScript1.java” .
18. After this step project structure looks like below:
19. Open “TestScript1.java” and add below code and save it:
package testScripts;

import org.testng.annotations.Test;

import baseClass.BaseClass;
import pages.CalculatorScreen;

public class TestScript1 extends BaseClass {

            @Test
            public void setup() throws InterruptedException {

                        CalculatorScreen cs = new CalculatorScreen(driver);
                        cs.clickButton_1();
                        cs.clickPlusButton();
                        cs.clickButton_2();
                        Thread.sleep(5000);

            }
}
20. Right click on your project and
select New – File and name it as
“testing.xml” and click on Finish
21. Add the below code in testing.xml file.
<suite name="parallel">
            <test name="Device-1">
             <parameter name="deviceName" value="emulator-5554" />
             <parameter name="udid" value="emulator-5554" />
             <parameter name="platformVersion" value="9.0" />
             <parameter name="url" value="http://0.0.0.0:4723/wd/hub" />

                        <classes>
                                    <class name="testScripts.TestScript1"/>
                        </classes>
            </test>
</suite>
22. Now your project structure looks like below:
23. Execution Output:
24. Console output:
[TestNGContentHandler] [WARN] It is strongly recommended to add
"<!DOCTYPE suite SYSTEM "http://testng.org/testng-1.0.dtd" >"
at the top of your file, otherwise TestNG may fail or not work as
expected.
[TestNG] Running:
D:\tutorialsWorkSpace\POMframework\testng.xml
Aug 28, 2019 4:16:42 PM
io.appium.java_client.remote.AppiumCommandExecutor$1 lambda$0
INFO: Detected dialect: W3C
===============================================
Total tests run: 1, Failures: 0, Skips: 0
===============================================
25. TestNg output:
26. To Run from pom.xml file add the below plugins into your
pom.xml file:
<build>
                        <plugins>
                                    <!-- Compiler plug-in -->
                                    <plugin>
                                                <groupId>org.apache.maven.plugins</groupId>
                                                <artifactId>maven-compiler-plugin</artifactId>
                                                <configuration>
                                                            <source>${jdk.level}</source>
                                                            <target>${jdk.level}</target>
                                                </configuration>
                                    </plugin>
                                    <!-- Below plug-in is used to execute tests -->
                                    <plugin>
                                                <groupId>org.apache.maven.plugins</groupId>
                                                <artifactId>maven-surefire-plugin</artifactId>
                                                <version>2.18.1</version>
                                                <configuration>
                                                            <suiteXmlFiles>
                                                                        <!-- TestNG suite XML files -->
                                                                        <suiteXmlFile>testng.xml</suiteXmlFile>
                                                            </suiteXmlFiles>
                                                </configuration>
                                    </plugin>
                        </plugins>
            </build>
27. Finally your pom.xml file looks like below, it will be good
if you replace your pom.xml file with below code in case if you
are new to maven:
<project xmlns="http://maven.apache.org/POM/4.0.0" xmlns:xsi="http://www.w3.org/2001/XMLSchema-instance"
  xsi:schemaLocation="http://maven.apache.org/POM/4.0.0 http://maven.apache.org/xsd/maven-4.0.0.xsd">
  <modelVersion>4.0.0</modelVersion>
  <groupId>Appium</groupId>
  <artifactId>POMframework</artifactId>
  <version>0.0.1-SNAPSHOT</version>

  <name>POMframework</name>
  <url>http://maven.apache.org</url>

  <properties>
                        <project.build.sourceEncoding>UTF-8</project.build.sourceEncoding>
            </properties>

            <repositories>
                        <repository>
                                    <id>spring-releases</id>
                                    <name>Spring Releases</name>
                                    <url>https://repo.spring.io/libs-release</url>
                        </repository>
            </repositories>
            <pluginRepositories>
                        <pluginRepository>
                                    <id>spring-releases</id>
                                    <name>Spring Releases</name>
                                    <url>https://repo.spring.io/libs-release</url>
                        </pluginRepository>
            </pluginRepositories>
            <dependencies>


                        <dependency>
                                    <groupId>junit</groupId>
                                    <artifactId>junit</artifactId>
                                    <version>3.8.1</version>
                                    <scope>test</scope>
                        </dependency>

                        <dependency>
                                    <groupId>io.appium</groupId>
                                    <artifactId>java-client</artifactId>
                                    <version>7.0.0</version>
                        </dependency>

                        <dependency>
                                    <groupId>org.testng</groupId>
                                    <artifactId>testng</artifactId>
                                    <version>6.9.13.6</version>
                        </dependency>
                        <dependency>
                                    <groupId>org.apache.commons</groupId>
                                    <artifactId>commons-math3</artifactId>
                                    <version>3.2</version>
                        </dependency>

                        <dependency>
                                    <groupId>org.springframework</groupId>
                                    <artifactId>spring-tx</artifactId>
                                    <version>3.2.2.RELEASE</version>
                        </dependency>
                        <dependency>
                                    <groupId>org.springframework</groupId>
                                    <artifactId>spring-orm</artifactId>
                                    <version>3.2.2.RELEASE</version>
                        </dependency>

                        <dependency>
                                    <groupId>commons-lang</groupId>
                                    <artifactId>commons-lang</artifactId>
                                    <version>2.6</version>
                        </dependency>

                        <dependency>
                                    <groupId>org.apache.commons</groupId>
                                    <artifactId>commons-lang3</artifactId>
                                    <version>3.1</version>
                        </dependency>

            </dependencies>

<build>
                        <plugins>
                                    <!-- Compiler plug-in -->
                                    <plugin>
                                                <groupId>org.apache.maven.plugins</groupId>
                                                <artifactId>maven-compiler-plugin</artifactId>
                                                <configuration>
                                                            <source>${jdk.level}</source>
                                                            <target>${jdk.level}</target>
                                                </configuration>
                                    </plugin>
                                    <!-- Below plug-in is used to execute tests -->
                                    <plugin>
                                                <groupId>org.apache.maven.plugins</groupId>
                                                <artifactId>maven-surefire-plugin</artifactId>
                                                <version>2.18.1</version>
                                                <configuration>
                                                            <suiteXmlFiles>
                                                                        <!-- TestNG suite XML files -->
                                                                        <suiteXmlFile>testng.xml</suiteXmlFile>
                                                            </suiteXmlFiles>
                                                </configuration>
                                    </plugin>
                        </plugins>
            </build>

</project>
28. Right click on your “pom.xml” file and go to “Run As” and click on “maven install”
29. Console output should like below:
Right click on your “pom.xml” file and go to “Run As”
and click on “maven test”
30. Test execution output:
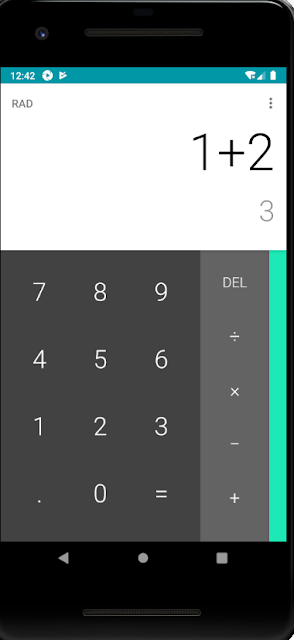
you can see in the below image it clicked, 1 then + then 2 then it
clicked = and it showing result at 3.
31. Console output: in console output we can see it shows as “Build Success”,
that means your scripts are executed successfully without error. If
any issues, there it shows as “Build Failure”.
Now we are ready with Appium tests. Lets start configure Jenkins
for Appium:
1. Install Jenkins – Follow this post “Howto Install Jenkins Server on Windows Machine”
2. Open Jenkins Server url : http://localhost:8080/login?from=%2F
3. Enter username and password and click on “Sign in”
button:
4. Click on “New Item” from left navigation menu:
5. Enter “AppiumMavenBuild” in the “Enter an item name” text field and select “Freestyle project” Then Click on
“OK” button:
6. Then job configuration page looks like below:
7. Got to “Build” section:
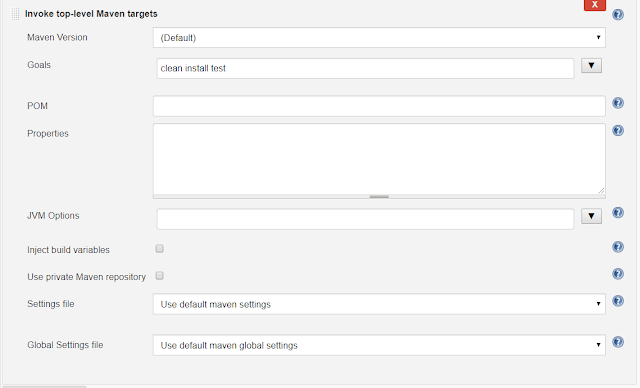
8. Select “Add build step” drop down and select “Invoke top-level maven targets” option from the drop down:
9. Enter “clean install test” in the “Goals” and click
on “advanced..” button:
10.
Now navigate to your maven project in the eclipse & Select the pom.xml file path :
My pom.xml file path is : D:\tutorialsWorkSpace\POMframework\pom.xml
11. Add this path in “POM” text field as shown in the below
screenshot:
12. Click on “Apply” and “Save” button:
13.
Now successfully Job for Appium scripts execution is completed:
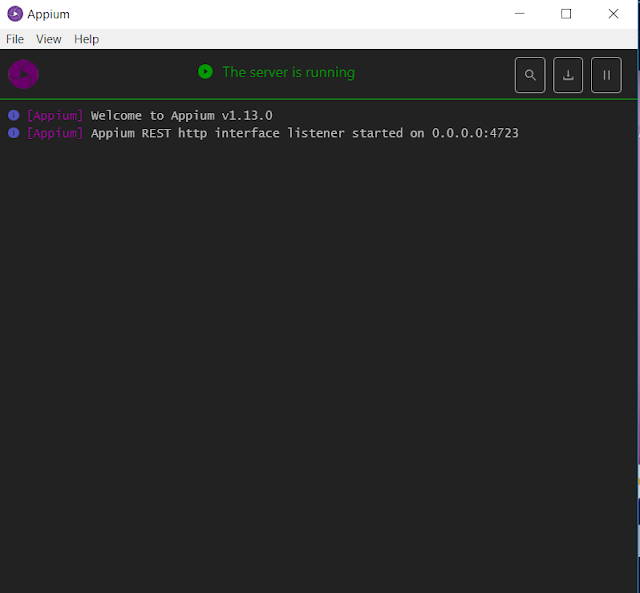
14. Make sure your Appium server is up and running:
15. And make sure your mobile is connected:
16. Click on “Build Now” from the left navigation for “Project AppiummavenBuild”
17. Build started:
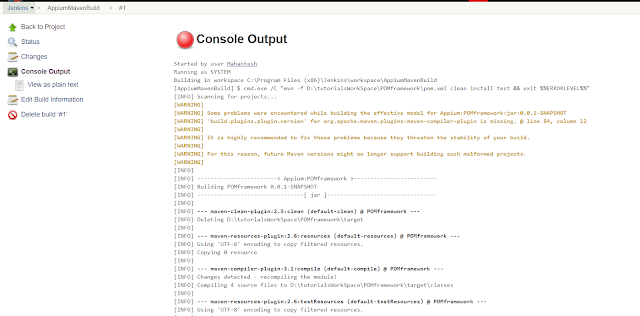
18. Click on your build and select “console output” :
19. Console output on the Jenkins Job:
20. Tests are running:
21. Build success on Jenkins console:
22. Output on Mobile device:
Now we have successfully configured Appium with Jenkins and ran the
job.


thanks for the detailed explanation!
ReplyDeletepeople like you are a blessing to people like us
Great explanation. Thanx.
ReplyDeleteThank you sir.. It help me a lot
ReplyDeleteThis was great thanks
ReplyDelete