How to Create POM framework with Selenium Java + Cucumber | Selenium Java BDD Framework
In this post let's learn how to create Selenium Page object Model framework using Java, Maven & Cucumber.
Follow the below steps:
1. Install Java and set the Java path
2. Maven plugin installation in Eclipse
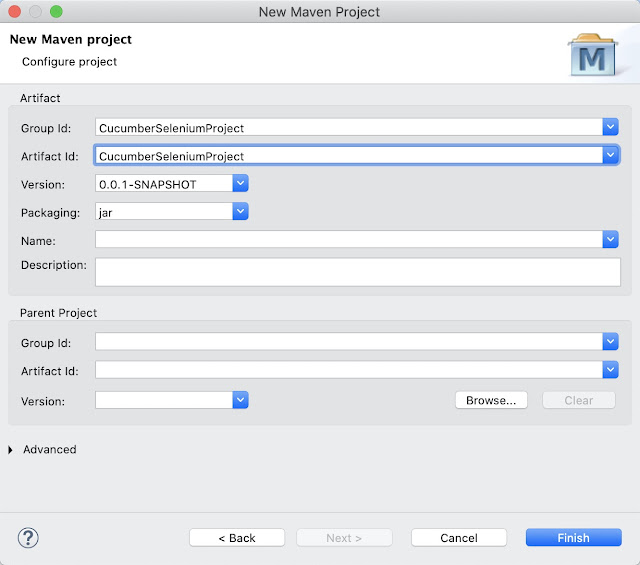
3. Create a Maven project.
o Go to File → New → Others → Maven → Maven Project → Next.
o Provide group Id (group Id will identify your project uniquely across all
projects). Here I’m giving as CucumberSeleniumProject
o Provide artifact Id.
o Click on Finish.
4. Open pom.xml −
· Go to the package explorer on the left hand side of Eclipse.
· Expand the project “CucumberSeleniumProject”.
· Locate pom.xml file.
· Right-click and select the option, Open with “Text Editor”.
Add dependency for Selenium − This will indicate Maven, which Selenium jar
files are to be downloaded from the central repository to the local
repository.
· Open pom.xml is in edit mode and add required jars. POM looks like
below:
<project xmlns="http://maven.apache.org/POM/4.0.0" xmlns:xsi="http://www.w3.org/2001/XMLSchema-instance" xsi:schemaLocation="http://maven.apache.org/POM/4.0.0 https://maven.apache.org/xsd/maven-4.0.0.xsd">

  <modelVersion>4.0.0</modelVersion>

  <groupId>CucumberSeleniumProject</groupId>

  <artifactId>CucumberSeleniumProject</artifactId>

  <version>0.0.1-SNAPSHOT</version>


  <properties>

          <maven.compiler.source>1.8</maven.compiler.source>

          <maven.compiler.target>1.8</maven.compiler.target>

          <project.build.sourceEncoding>UTF-8</project.build.sourceEncoding>

     </properties>

     <dependencies>

          <!-- https://mvnrepository.com/artifact/org.seleniumhq.selenium/selenium-java -->

          <dependency>

               <groupId>org.seleniumhq.selenium</groupId>

               <artifactId>selenium-java</artifactId>

               <version>3.141.59</version>

          </dependency>

          <!-- https://mvnrepository.com/artifact/io.github.bonigarcia/webdrivermanager -->

          <dependency>

               <groupId>io.github.bonigarcia</groupId>

               <artifactId>webdrivermanager</artifactId>

               <version>4.0.0</version>

          </dependency>

          <!-- https://mvnrepository.com/artifact/io.cucumber/cucumber-java -->

          <dependency>

               <groupId>io.cucumber</groupId>

               <artifactId>cucumber-java</artifactId>

               <version>5.7.0</version>

          </dependency>

          <!-- https://mvnrepository.com/artifact/io.cucumber/cucumber-junit -->

          <dependency>

               <groupId>io.cucumber</groupId>

               <artifactId>cucumber-junit</artifactId>

               <version>5.7.0</version>

               <scope>test</scope>

          </dependency>


          <!-- https://mvnrepository.com/artifact/org.assertj/assertj-core -->

          <dependency>

               <groupId>org.assertj</groupId>

               <artifactId>assertj-core</artifactId>

               <version>3.16.1</version>

               <scope>test</scope>

          </dependency>


     </dependencies>


     <build>

          <plugins>

               <plugin>

                     <groupId>org.apache.maven.plugins</groupId>

                     <artifactId>maven-surefire-plugin</artifactId>

                     <version>2.22.2</version>

                     <configuration>

                          <testFailureIgnore>true</testFailureIgnore>

                          <runOrder>Alphabetical</runOrder>

                          <includes>

                               <include>**/*CukesRunner.java</include>

                               <include>**/*FailedTestRunner.java</include>

                          </includes>

                     </configuration>

               </plugin>

               <plugin>

                     <groupId>net.masterthought</groupId>

                     <artifactId>maven-cucumber-reporting</artifactId>

                     <version>5.0.0</version>

                     <executions>

                          <execution>

                               <id>execution</id>

                               <phase>verify</phase>

                               <goals>

                                    <goal>generate</goal>

                               </goals>

                               <configuration>

                                    <projectName>Cucumber HTML Reports</projectName>

                                    <outputDirectory>${project.build.directory}</outputDirectory>

                                    <inputDirectory>${project.build.directory}</inputDirectory>

                                    <jsonFiles>

                                         <param>**/cucumber*.json</param>

                                         <param>**/failedcucumber*.json</param>

                                    </jsonFiles>

                               </configuration>

                          </execution>

                     </executions>

               </plugin>

          </plugins>

     </build>

</project>
- Verify binaries.
· Once pom.xml is edited successfully, save it.
· Go to Project → Clean − It will take a few minutes.
· You will be able to see a Maven Dependencies.
5. Create a "features" package under "src/test/resources"
- Create feature file
- Select and right-click on the "features" package.
- Click on ‘New’ file.
- Give the file a name such as GoogleSearch.feature.
- Write the following text within the file and save it.
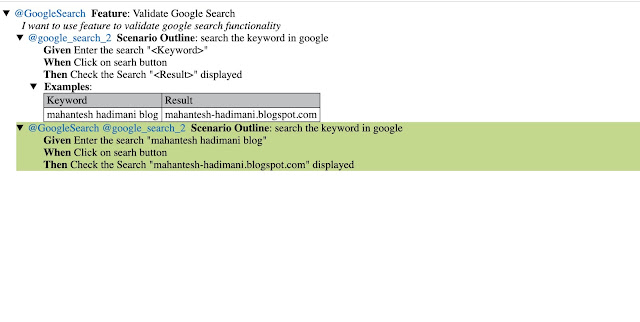
@GoogleSearch

Feature: Validate Google Search

  I want to use feature to validate google search functionality


  @google_search_1

  Scenario: Validate google page is displayed

    Given Google page is loaded

    Then validate search input box displayed


  @google_search_2

  Scenario Outline: search the keyword in google

    Given Enter the search "<Keyword>"

    When Click on searh button

    Then Check the Search "<Result>" displayed

  Examples:

      | Keyword            |   Result |

      | mahantesh hadimani blog             | mahantesh-hadimani.blogspot.com |
6. Create “configuration.properties” file
Right click on your project folder "cucumberSeleniumProject” and
click on new file and name it as "configuration.properties” file
Copy the below text and paste it in the properties file:
browser=chrome

url=https://www.google.com/

implicitWait= 10

explicitWait= 20

shortWait= 5

longWait= 30
7. Create “utilities” package under “src/test/java” folder
Under “utilities” package, create new java file and
name it as "ConfigurationReader.java" and copy the below code and put it under
that
package utilities;


import java.io.FileInputStream;

import java.util.Properties;


/**

 * reads the properties file configuration.properties

 */

public class ConfigurationReader {


    private static Properties properties;


    static {


        try {

            String path = "configuration.properties";

            FileInputStream input = new FileInputStream(path);

            properties = new Properties();

            properties.load(input);


            input.close();

        } catch (Exception e) {

            e.printStackTrace();


        }

    }


    public static String get(String keyName) {

        return properties.getProperty(keyName);

    }


}
8. Create Driver.java
Under “utilities” package, Create new java file and name it as
“Driver.java” and put the below code in that:
package utilities;


import io.github.bonigarcia.wdm.WebDriverManager;

import org.openqa.selenium.WebDriver;

import org.openqa.selenium.WebDriverException;

import org.openqa.selenium.chrome.ChromeDriver;

import org.openqa.selenium.chrome.ChromeOptions;

import org.openqa.selenium.edge.EdgeDriver;

import org.openqa.selenium.firefox.FirefoxDriver;

import org.openqa.selenium.firefox.FirefoxOptions;

import org.openqa.selenium.ie.InternetExplorerDriver;

import org.openqa.selenium.safari.SafariDriver;


import utilities.ConfigurationReader;


import java.util.Arrays;


public class Driver {


      private Driver() {

         }


         private static WebDriver driver;


         public static WebDriver get() {

             // Test

             if (driver == null) {

                 // this line will tell which browser should open based on the value from properties file

                 String browser = ConfigurationReader.get("browser");

                 switch (browser) {

                     case "chrome":

                         WebDriverManager.chromedriver().setup();

                         ChromeOptions options = new ChromeOptions();

                         options.addArguments("start-maximized");

                         options.setExperimentalOption("excludeSwitches",  Arrays.asList("disable-popup-blocking"));

                         options.setExperimentalOption("excludeSwitches", new String[]{"enable-automation"});

                         options.setExperimentalOption("useAutomationExtension", false);

                         options.addArguments("--incognito");

                         driver = new ChromeDriver(options);

                         driver = new ChromeDriver();

                         break;

                     case "chrome-headless":

                         WebDriverManager.chromedriver().setup();

                         driver = new ChromeDriver(new ChromeOptions().setHeadless(true));

                         break;

                     case "firefox":

                         WebDriverManager.firefoxdriver().setup();

                         driver = new FirefoxDriver();

                         break;

                     case "firefox-headless":

                         WebDriverManager.firefoxdriver().setup();

                         driver = new FirefoxDriver(new FirefoxOptions().setHeadless(true));

                         break;

                     case "ie":

                         if (!System.getProperty("os.name").toLowerCase().contains("windows"))

                             throw new WebDriverException("Your OS doesn't support Internet Explorer");

                         WebDriverManager.iedriver().setup();

                         driver = new InternetExplorerDriver();

                         break;


                     case "edge":

                         if (!System.getProperty("os.name").toLowerCase().contains("windows"))

                             throw new WebDriverException("Your OS doesn't support Edge");

                         WebDriverManager.edgedriver().setup();

                         driver = new EdgeDriver();

                         break;


                     case "safari":

                         if (!System.getProperty("os.name").toLowerCase().contains("mac"))

                             throw new WebDriverException("Your OS doesn't support Safari");

                         WebDriverManager.getInstance(SafariDriver.class).setup();

                         driver = new SafariDriver();

                         break;

                 }


             }


             return driver;

         }


         public static void closeDriver() {

             if (driver != null) {

                 driver.quit();

                 driver = null;

             }

         }


}
9. Create BasePage.java
Under “utilities” package, Create new java file and name it
“BasePage.java” and put the below code in that
package utilities;


import org.openqa.selenium.interactions.Actions;

import org.openqa.selenium.support.PageFactory;


import utilities.Driver;


public class BasePage {


public BasePage(){

    PageFactory.initElements(Driver.get(),this );

  }


  Actions action = new Actions(Driver.get());


}
10. Now lets create GoogleSearch page ,
· Select and right-click on the “src/test/java” and create new package
“pages” .
· Select the “pages” package and right click and Click on ‘New’ file.
Give the file name a name such as GoogleSearchPage.java and copy the below code to it:
package pages;


import utilities.BasePage;

import org.openqa.selenium.WebElement;

import org.openqa.selenium.support.FindBy;


public class GoogleSearchPage  extends BasePage  {


     @FindBy(xpath="//input[@title='Search']")

     public WebElement txtboxSearch;


     @FindBy(xpath="(//input[@value='Google Search'])[2]")

     public WebElement btnSearch;


     @FindBy(xpath = "(//cite)[1]")

     public  WebElement firstSearchResult;


     public void clickSearchBtn(){

         btnSearch.click();

     }


     public void inputSearchKeyword(String keyword){

     txtboxSearch.sendKeys(keyword);

     }


     public String getFirstSearchResult()

     {

         return firstSearchResult.getText();

     }


}
11. Create Pages.java
Under “utilities” package, Create new java file and name it
“Pages.java” and copy the below code to it:
package utilities;


import pages.GoogleSearchPage;;


public class Pages {


     private GoogleSearchPage googleSearchPage;


     public GoogleSearchPage googleSearchPage(){

        if (googleSearchPage == null) {

          googleSearchPage = new GoogleSearchPage();

        }

        return googleSearchPage;

    }


}
12. Create step definition file −
· Select and right-click on the "src/test/java" and create new package
“step_definition” .
· Select the “step_definition” package and right click and Click on ‘New’
file.
· Give the file name a name such as "GoogleSearch.java"
· Write the following code within the file and save it.
package step_definition;


import utilities.Pages;

import io.cucumber.java.en.*;

import org.junit.Assert;


public class GoogleSearch {


    Pages page = new Pages();


    @Given("Google page is loaded")

    public void google_page_is_loaded() {

        page.googleSearchPage().txtboxSearch.isDisplayed();

    }


    @Given("validate search input box displayed")

    public void validate_search_input_box_displayed() {

    page.googleSearchPage().txtboxSearch.isDisplayed();

    }


    @Given("Enter the search {string}")

    public void enter_the_search(String string) {

        // Write code here that turns the phrase above into concrete actions

    page.googleSearchPage().inputSearchKeyword(string);


    }


    @When("Click on searh button")

    public void click_on_searh_button() {

        // Write code here that turns the phrase above into concrete actions

     page.googleSearchPage().clickSearchBtn();


    }


    @Then("Check the Search {string} displayed")

    public void check_the_Search_displayed(String expectedValue) {

        // Write code here that turns the phrase above into concrete actions

    String result= page.googleSearchPage().getFirstSearchResult();

    System.out.println(result);

    Assert.assertEquals(expectedValue,result);


    }


}
13. Create Test Runner file −
· Select and right-click on the "src/test/java" and create new package
“runner” .
· Select the “runner” package and right click and Click on ‘New’
file.
· Give the file name a name such as "CukesRunner.java"
Write the following code within the file and save it.
package runner;


import io.cucumber.junit.Cucumber;

import io.cucumber.junit.CucumberOptions;

import org.junit.runner.RunWith;


@RunWith(Cucumber.class)

@CucumberOptions(

       //plugin = {"json:target/cucumber.json", "rerun:target/rerun.txt"},

          //plugin = { "pretty" },

          plugin = {"pretty", "html:target/Destination","json:target/cucumber.json", "rerun:target/rerun.txt"},

                     features = "src/test/resources/features",

                  glue = "/step_definition",

        dryRun = false,

        tags = "@google_search_2"

)

public class CukesRunner {


}
14. Now Lets create Hooks file:
· Select the “step_definition” package and right click and Click on
‘New’ file.
· Give the file name a name such as Hooks.java.
· Write the following code within the file and save it.
package step_definition;


import utilities.ConfigurationReader;

import utilities.Driver;

import io.cucumber.java.After;

import io.cucumber.java.Before;

import io.cucumber.java.Scenario;

import org.openqa.selenium.OutputType;

import org.openqa.selenium.TakesScreenshot;

import org.openqa.selenium.WebDriver;

import org.openqa.selenium.interactions.Actions;

import org.openqa.selenium.support.ui.WebDriverWait;


import java.util.concurrent.TimeUnit;


public class Hooks {


    @Before

    public void setUp(){

        Actions actions;

        WebDriverWait wait;

        WebDriver driver = Driver.get();

        driver.get(ConfigurationReader.get("url"));

        driver.manage().window().maximize();

        driver.manage().timeouts().implicitlyWait(Long.parseLong(ConfigurationReader.get("implicitWait")), TimeUnit.SECONDS);

//        actions = new Actions(driver);

//        wait = new WebDriverWait(driver,Long.parseLong(ConfigurationReader.get("explicitWait")));

    }


    @After

    public void tearDown(Scenario scenario) throws InterruptedException{


        if (scenario.isFailed()) {

            final byte[] screenshot = ((TakesScreenshot) Driver.get()).getScreenshotAs(OutputType.BYTES);

            scenario.attach(screenshot, "image/png", "screenshot");

        }


        Thread.sleep(10000);

        Driver.closeDriver();

    }


}
Now project structure looks like below:
15. Run the test using option −
· Select CukesRunner.java file from the package explorer.
· Right-click and select the option, Run as.
· Select JUnit test.
You will observe the following things upon execution −
· An instance of Chrome web browser will open.
· It will open the Google Home page on the browser.
· It will detect the Search Input button and it will enter the Google website
in the search input and it will click on search button and it will make sure
google.co.in is displayed the result
· The browser will close.
· In the JUnit window, you will see a scenario with green tick mark, which
indicates success of the test execution.
Console Output:
HTML Report:


No comments:
Post a Comment
If any suggestions or issue, please provide